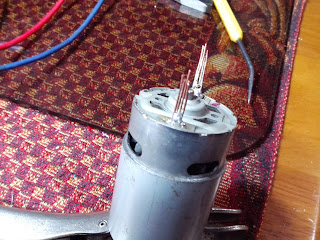

A lot of people think the motor is destroyed when the fragile brass terminal connector that connects the wire to the motor's brush tears off. It happens all the time from wear and tear or even from disconnecting a terminal plug when they are brand spanking new. Most times there aren't replacements available for a darn good motor that has years of service ahead of it.
Here is a quick and dirty fix which is not only a temporary fix, but could be way more secure than the original tab ever was. First, most often it breaks off at the motor frame and there is no metal to solder anything to. If you are lucky, you have a small gap wide enough to insert a couple strands of thin (stripped 24 gauge or smaller) solid copper wire. But most there will be no way to clean the existing metal. Lets change that! (If you can get away without drilling, don't drill! If you get to aggressive, it can destroy the brush terminal!) Take the smallest drill bit you can find, most often that will be 1/16th of an inch. If possible, go even smaller with specialty bits. We're not drilling through the case, so take it slow with a hand drill or drill press. I used a hand driven twist drill since you just want to open up/clean the area beside the motor's connector enough for a couple pieces of thin copper wire.
You want to drill straight down beside the existing brush/terminal connection. A power drill will drill a hole too quick and chew the brass brush to bits. I fit 4 small pieces of solid strand copper wire beside the broken brass terminal. Then solder the brass and copper together making a new solid tab. That's it. Test your motor and you are good to go!
This motor required that both terminals be repaired. Works as good as new!
If you notice the circuit board in the upper photo with 8 mosfet and close to 30 transistors. Our new dual 45 amp motor controller for the upcoming robot! Lots of good stuff coming, stayed tuned!

No comments:
Post a Comment